Source: Pexels
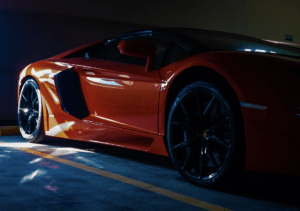
Ever wondered how you could bring out the shine and gloss of your car’s paint? Bring back some life to the colour and exuberate that new-car look and feel? Chances are, what you are looking for is a premium car detailing service for the exterior or otherwise a Cut and Polish.
A cut and polish is generally what a professional car detailer would do to restore your car’s colour and condition, one step being the cut and the second being the polish. Yes it’s true that a service as such can often cost you from hundreds to even thousands of dollars depending on the difficulty of the task. Some vehicles may need more stages, therefore more product, time and effort. Nonetheless, here we will cover a simple DIY guide on how you could perform a Cut and Polish like a professional and relive that nostalgic new car gloss.
Before we get started, make sure you are equipped with the right tools and equipment. Chances are, you may already have half of this and if you are a car enthusiast or someone who just loves their car, you may have the main bulk of these items.
- Pressure Washer
- Bucket and Car Wash Shampoo
- Microfibre Car Wash Mitt
- Machine DA Buffer/Polisher (make sure it’s not rotary, will explain later)
- Heavy to Medium Compound
- Light Finishing Polish
- Spray Wax
- Clay Bar
- Microfibre Towels
- Tape
- Isopropyl Alcohol mixed with water in a spray 1:1
- Applicator pads
- Patience and some elbow grease
Before you start detailing, make sure your car is parked in the right environment. So what is considered the best environment for car detailing?
It is always recommended to have your car washed in a cool area that offers great shade. Detailing the car under the sun can be very challenging and makes washing the car and buffing very difficult as products tend to evaporate rapidly upon contact (especially for dark coloured cars) when the surface is hot. Ensure that there is sufficient lighting so that you can compare from panel to panel and see how much correction has been performed.
Steps
- Rinse the car with the pressure washer
This step allows you to blast off as much as surface dirt as possible. Failing to do so properly can cause scratching to occur in the next few steps. - Shampoo the car using the wash mitt and start from the roof down
In your bucket of water and shampoo, allow your microfibre wash mitt to sit in there and soak up the shampoo. In the meantime, fill up a second bucket purely for rinsing your wash mitt when it gets dirty. This is known as the two-bucket car wash method and is great for reducing contamination. Use your pressure gun to foam up the soap before using it, feel free to use a generous amount of soap-water mixture when washing, offers great lubrication and cleaning power. - Rinse the car down using the pressure washer to remove the shampoo
Last thing you will want to happen is have the shampoo dry on to the paint surface as it can be a pain to remove. So if you are parked in a fairly hot area, best to wash and rinse panel by panel - Quickly dry the car down using a large microfibre drying towel
Microfibre in general is a very safe material to use when cleaning the car as it scratch-free (remember to rip off the plastic tags prior to use as to avoid scratching). This is why it has taken over the historical sponge and chamois combination, which is rarely used today as these have been found to be prone to scratching the paint as dirt gets trapped in the fibre. - Decontaminate the paint with a clay bar
Using car wash shampoo mixed with water, generously spray or apply some across each panel of the car as you work through it with a clay bar. A clay bar will remove contaminants that a regular car wash will not remove eg. Tree sap, stubborn bird droppings and so on. Keep doing multiple passes in an up and down motion until the surface feels smooth. Simply just wipe off the excess fluid when done. - Cleanse each panel with IPA
Isopropyl Alcohol, also known as rubbing alcohol, is great for removing existing wax. You will want to start off a clean canvas before buffing and IPA ideal for this. - Buff the car panel by panel using a heavy to medium compound (Cut)
Apply some compound on to the machine buffer and buff the vehicle in a cross-hatch manner ie only up and down, no swirling around in circles. Apply light pressure and allow the machine and product to do its work. Best to work in a section by section basis for comparison. Using a medium – heavy compound will allow you to correct and restore the paint more effectively as it contains abrasive components. Once done, wipe off excess compound with a clean towel to reveal the shine and inspect, if you are happy, proceed to the next step. - Buff the car panel by panel using a light finishing polish (Polish)
Conduct step 7 again, but instead use a light finishing polish instead of the medium-heavy compound. This will allow you to apply the finishing touch to smoothen the surface. It also contains abrasives, but too a much lesser level of aggressiveness than the compound. This will allow you to smoothen out the surface and provide a real nice shine. Once again, wipe the excess off with a towel - Finally – Apply Wax
To seal in the work that you have just performed ie the cut and polish, you will want to apply a wax. Any wax is fine between your liquid, paste and spray forms, they will just vary mainly in durability. But if you are after a quick easy application a spray wax is the way to go, simply spray on wipe on, allow it to sit for a minute or so before wiping it off with a clean microfibre towel.
Well there you have it. How to perform an exterior detail, cut and polish, on your car like a professional to rejuvenate that gloss and shine.