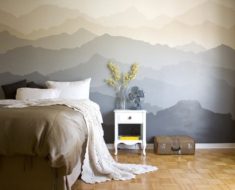
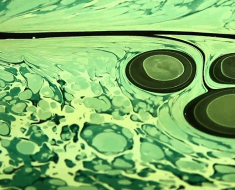
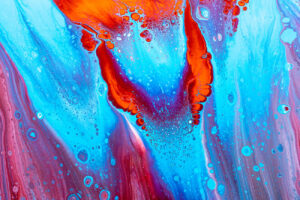
The popularity of Pour Painting reflects the trend in geodes and marbling.
Pexels
What methods are available for acrylic pouring? There are many approaches to each creative form, but it still helps have some direction, particularly for beginners. We have prepared this step-by-step instruction to assist you with one of the most popular paint pouring methods.
What is Acrylic Pouring?
Acrylic Pour is a term that refers to the process of pouring acrylic.
It is an abstract art method in which artists create art by pouring fluid acrylic paints onto a surface. Acrylic pouring, like alcohol ink and resin painting, is a kind of “fluid art.”
“Acrylic pouring” art may be used to make stunning backgrounds for dreamscape landscapes, coasters, and other home décor, as well as unique fake marble countertops. With several acrylic pouring methods available, knowing where to begin may be challenging. We have included a comprehensive list of the most popular acrylic paint pouring methods in this tutorial so you can discover them all in one spot. If you are very appealed to this pouring art, you can also check out how to use Alcohol Inks in your painting.
Materials for Acrylic Pouring
The ingredients required for any fluid painting method are mostly the same; you will need paint, some form of medium, and a surface. Based on the intended outcome, you may choose to add silicon or a small amount of water. We will address any extra ingredients or concerns for each method but presume that the method needs simply paint and medium if no more ingredients are specified. To get started, here are some necessary supplies:
- Paint Set
- Pouring Medium: Floetrol
- Silicone Oil: For Cells
- White Blank Canvas
Naturally, the advantage of acrylic pouring is that this is entirely customizable, so feel free to modify the formulae to suit your requirements!
Consistency and Recipe for Acrylic Pouring Paint
Each acrylic pouring method requires that your paints are prepared and ready to begin with. To start, choose your colors.
While there are other methods for mixing the paint, we have included a simple acrylic pouring formula below.
- The Floetrol (2 parts)
- Distilled water (hard water or tap water containing minerals can behave differently and affect the way paint floats; so, use distilled water)
- Silicone (just a few drops)
- Paint in acrylic (1 part)
The desired outcome is the proper paint consistency. You will modify the consistency and combination to match your employing method and the intended output with practice. However, for the time being, aim for warm honey or syrup consistency. When poured, this should make a thin stream, not droplets. Otherwise, the mixture may just be too thick. However, you do not want that to be watery either – you need to hit the right viscosity.
Once you have picked your colors and mixed your paint, you are ready to use the methods below.
Pour Art Fundamentals
A clean or straightforward pour is the technique of pouring a single color over a surface one at a time. Occasionally, the purpose is to get it just on the surface individually and maintain them a certain way, or perhaps an artist may work with one hue at the moment and then swirl the shades together in complicated patterns using a stick or other instrument.
Clean Pours are ideal for producing abstract vintage art or color block works.
How to Create a Clean Pour
Combine your paint and selected medium until the paint has the consistency of warm, runny honey. It should flow freely but not be “drippy” or viscous and sludge-like.
Once your paint is correctly mixed, pour one shade at a time onto the specified surface.
If you want the color’s edges to mix, adjust the surface to shift the colors around or leave the paint alone to retain crisp lines.
Paint thickness is critical in every pour: if your paint is too thick, it will not cure correctly, resulting in cracks in the completed painting.
Techniques for Pouring Acrylics
When we say “basic method,” we are talking about acrylic pouring methods appropriate for both novice and experienced painters. These procedures need little preparation and may be accomplished using things that most individuals already have in their homes.
Clean/Traditional Pour
The most straightforward sort of pour is the clean or classic pour. It is accomplished by pouring distinct colors of paints onto a canvas and then rotating and turning the canvas to get the desired effect.
Dirty-cup Pour
Compared to the clean pour, a dirty-cup pour is when the colors meet and create patterns and cells among themselves. To do a dirty-cup pour, fill your cup halfway with paint, simply pouring the colors into each other at varying heights and speeds to change the quantity of paint that mixes. Then just pour this over the canvas and allow the paint to perform its magic!
Flip-cup Pour
A flip-cup pour is essentially a dirty-cup pour where you get some help from good old gravity. To do this acrylic pour method, which is one of our favorites, set your paint cup as described above for the dirty-cup pour, then place your canvas face down on top of the cup and flip. Allow the paint to settle on the canvas and twist as desired.
Flip-and-drag Pour
The flip-and-drag pour is a variation on the flip-cup pour in which the cup is dragged over the canvas before being released.
Floating-cup Pour
A floating-cup pour is comparable to a flip-cup pour, except that you first apply an essential coat of paint on the cup before flipping it. Then, poke a hole in the center/top of the cup to relieve the pressure, allowing you to move the cup around gently while dragging it (paint), or just raise the cup gently as you drag it.
Conclusion
There are several techniques for creating a beautiful poured work of art. You also do not need to carefully follow the guidelines for any particular acrylic pouring technique—mix & match, and experiment! Check out oil paintings for sale from The Art of Richard Stanley.